If you share your car with a furry companion, you already know the struggle: pet hair weaves itself into seat fabric, hides in carpet fibers, and somehow finds its way into every corner of your vehicle no matter how careful you are. A quick brush-off barely scratches the surface, and standard cleaning methods often fall short against stubborn, embedded fur.
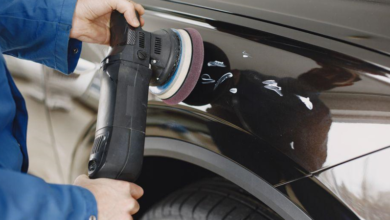
That’s where auto detailing comes in. Rather than a simple wipe-down, detailing is a thorough, systematic approach to restoring your car’s interior to its cleanest possible state. At the heart of any effective detailing routine for pet owners is the right vacuum — one built to handle the unique challenge of pulling embedded hair from upholstery, carpets, and tight crevices.
This article walks you through everything you need to know: why regular detailing matters for pet owners, how to choose a vacuum with the suction power and attachments to get the job done, and a practical step-by-step process for achieving a truly clean interior. Whether you’re dealing with a light dusting of fur or a full-on shedding season, the right tools and techniques make all the difference.
Why Auto Detailing is Crucial for Pet-Owning Car Enthusiasts
Pet hair does far more damage to your car’s interior than it might appear. Beyond the obvious visual mess, fur that settles deep into seat fabric and carpet fibers traps moisture, dander, and bacteria — creating a breeding ground for odors that grow harder to eliminate the longer they’re left untreated. For anyone with allergies, even brief exposure to a hair-laden interior can trigger sneezing, itchy eyes, and respiratory discomfort, turning every drive into an unpleasant experience.
There’s also a practical concern around vehicle value. Upholstery that’s repeatedly exposed to embedded pet hair begins to wear faster, with fibers breaking down under the friction of fur working its way deeper into the material. Stains from damp fur compound the problem, leaving marks that standard spot-cleaning can’t fully address. When it comes time to sell or trade in your vehicle, a neglected interior significantly reduces what buyers or dealers are willing to offer.
Regular auto detailing directly counters all of these issues. Unlike a quick vacuum pass, detailing involves a systematic, thorough cleaning that targets embedded hair, eliminates odor-causing buildup, and restores upholstery to a condition that preserves both comfort and resale value. For pet owners specifically, building a consistent detailing routine isn’t just about aesthetics — it’s a practical investment in hygiene, health, and the long-term condition of your vehicle.
Choosing the Right Car Vacuum for Powerful Pet Hair Removal
Not every vacuum is built for the specific demands of pet hair removal in a car interior. A household upright might have the suction, but it lacks the reach and maneuverability to get into tight spaces between seats or along door panels. Choosing a vacuum designed — or at least well-suited — for automotive use means the difference between a genuinely clean interior and one that still has fur embedded in every fabric surface.
Key Features to Look For: Powerful Suction and Beyond
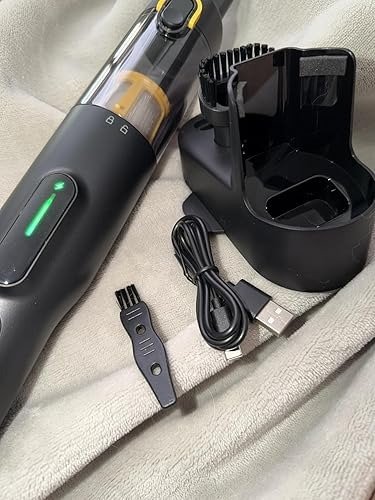
Suction power is the starting point, but it’s not the whole picture. Look for a vacuum that maintains consistent suction even as its dustbin fills, since pet hair compresses quickly and can reduce performance fast. Equally important are the attachments: a crevice tool reaches between seat cushions and along baseboards, while a motorized brush head actively agitates carpet fibers to pull embedded hair to the surface rather than just skimming over it. Cord length or battery life matters too — a short cord or weak battery will interrupt your workflow midway through a thorough clean.
Comparing Vacuum Types: From Standard Car Vacuums to Specialized Vacuums for Pets
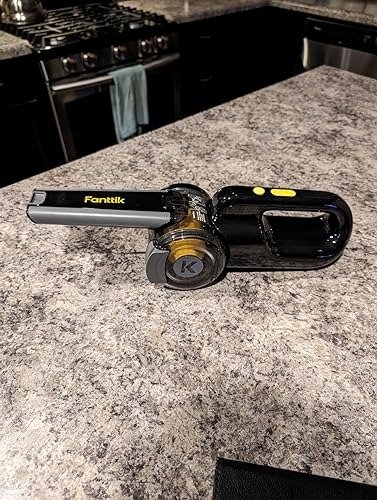
Handheld corded vacuums offer reliable, consistent suction and are typically the most affordable entry point, though the cord can limit your range of motion inside the cabin. Cordless models trade some raw power for freedom of movement, making them practical for quick clean-ups between deeper sessions — brands like Fanttik have built cordless car vacuums specifically around this balance of portability and sustained suction for automotive use. Wet/dry vacuums handle the worst-case scenarios — muddy paw prints, damp fur — but their bulk makes them better suited for driveway use than tight interior work. Dedicated pet hair vacuums, whether handheld or full-sized, often include rubberized brush attachments specifically engineered to grab and release fur without clogging, making them the most effective choice for pet owners who deal with heavy shedding regularly.
Step-by-Step Guide to Detailing Your Car with a Vacuum
A thorough detailing session requires more than running a vacuum over the seats and calling it done. Pet hair embeds itself at different depths across different surfaces, so a methodical approach — working through the interior in deliberate stages — is what separates a genuinely clean result from one that still has fur lurking in the fibers.
Step 1: Preparation and Tool Gathering for Effective Automotive Cleaning
Before the vacuum comes out, gather everything you’ll need: your vacuum with its full attachment set, a pair of rubber gloves, microfiber cloths, a stiff-bristle upholstery brush, and a lint roller for finishing work. Start by removing floor mats completely and shaking them out outside the vehicle to dislodge loose debris and surface-level hair. Clear out any items stored in seat pockets or on the floor — clutter forces you to work around obstacles and guarantees you’ll miss spots. Taking five minutes to prep properly saves significant time once the actual cleaning begins.
Step 2: Techniques for Removing Pet Hair with Your Car Vacuum
Put on the rubber gloves and run your hands across the seats in short, firm strokes — the friction pulls embedded hair into clumps that are far easier for the vacuum to pick up. A slightly damp microfiber cloth works the same way on stubborn patches. Once the hair is loosened, work through the interior in sections rather than jumping around: start with the seats, move to the seat backs, then tackle the floor. Use the motorized brush attachment on carpeted surfaces, running it against the grain of the fibers to agitate and lift embedded fur before switching to straight suction passes. For upholstered seats, the upholstery brush attachment provides enough agitation without damaging the fabric. Overlap each pass slightly to avoid leaving strips of fur between strokes.
Step 3: Deep Cleaning and Finishing Touches for a Pristine Interior
Once the main surfaces are clear, switch to the crevice tool and work along the seams where seat cushions meet the backrest, around the base of the center console, and along the door panel edges — these narrow gaps collect surprising amounts of hair that broader attachments simply can’t reach. Direct the crevice tool into air vents as well, where dander and fine hair accumulate and recirculate through the cabin. After vacuuming is complete, wipe down hard surfaces — the dashboard, door panels, and console — with a damp microfiber cloth to capture any remaining dander. Finish by reinstalling the cleaned floor mats and running a lint roller over the seats for a final pass that catches any last stray hairs the vacuum missed.
Maintenance Tips to Keep Your Car Clean and Pet-Hair-Free
Staying ahead of pet hair is far easier than tackling a months-long buildup, and a consistent maintenance routine makes that possible without demanding much time. A quick vacuum pass once a week — even just ten minutes focused on the seats and floor — prevents hair from working its way deeper into fabric fibers where it becomes significantly harder to remove. Scheduling a more thorough detailing session once a month keeps the interior in the kind of condition that a weekly pass alone can’t maintain.
Seat covers are one of the most practical investments a pet-owning driver can make. Waterproof, washable covers designed for pet use create a barrier between your upholstery and shedding fur, meaning most of the hair stays on the cover rather than embedding in the seat itself. When your dog or cat rides along, lay a dedicated blanket or mat across the back seat and cargo area — these can be shaken out and laundered regularly, keeping the actual interior far cleaner between detailing sessions.
After any trip with your pet, take two minutes to do a quick lint roller pass over the seats before the hair has a chance to settle in. Keeping a lint roller and a small handheld vacuum in the car makes this effortless. Brushing your pet thoroughly before they get in the vehicle also reduces the amount of loose fur that ends up in the cabin in the first place. These small, consistent habits compound over time, making each detailing session faster and more effective while keeping your interior genuinely clean — not just clean enough.
Clean Car, Happy Pet Owner: Making It a Lasting Habit
Keeping a pet-friendly car genuinely clean comes down to two things: the right vacuum and a consistent approach. A vacuum with strong, sustained suction and the proper attachments — particularly a motorized brush head and crevice tool — does the heavy lifting that standard cleaning simply can’t match. Pair that with the step-by-step detailing process outlined here, and embedded fur, lingering odors, and dander buildup become manageable problems rather than permanent fixtures of life with a pet.
The bigger picture is about habit. Weekly quick passes, monthly deep sessions, and small preventive measures like seat covers and pre-ride brushing compound into an interior that stays clean rather than one that only gets addressed when the mess becomes impossible to ignore. Beyond comfort and hygiene, that consistency protects your upholstery and preserves your vehicle’s value over time.
Traveling with a pet should be one of the simple pleasures of owning a car — not a source of ongoing frustration. With the right tools in hand and a routine that fits your schedule, there’s no reason a fur-covered interior has to be the trade-off. A clean car and a happy co-pilot can absolutely coexist.